【OpenCV】OpenCV3以降でDense SIFTを使いたい
画像から特徴量抽出する方法として、Dense SIFTを使いたいと思ったのですが、何故かOpenCV2のあるバージョンで削除されてしまったようです。ただ幸いkeypointを指定することでDense SIFTを実施できるようなのでメモします(とはいえSIFTの特許の問題があるので2019年3月までは様子見、もしくは別の抽出器を利用でしょうか)。
# dense_feature_detector.py

import cv2

class DenseFeatureDetector(object):
    def __init__(self, detector, step, scale, start):
        self._detector = detector
        self._step = step
        self._scale = scale
        self._start = start
        pass

    def detect(self, image):
        # Convert image to gray if it is color
        if len(image.shape) == 3:
            gray_image = cv2.cvtColor(image, cv2.COLOR_BGR2GRAY)
        else:
            gray_image = image

        # Create dense keypoints
        keypoints = self._create_keypoints(gray_image)
        _, features = self._detector.compute(image, keypoints)
        return keypoints, features

    def _create_keypoints(self, gray_image):
        keypoints = []
        rows, cols = gray_image.shape
        for y in range(self._start, rows, self._step):
            for x in range(self._start, cols, self._step):
                keypoints.append(cv2.KeyPoint(float(x), float(y), self._scale))
        return keypoints
# main.py

import cv2
from dense_feature_detector import DenseFeatureDetector

if __name__ == '__main__':
    image = cv2.imread('lenna.jpg')
    sift = cv2.xfeatures2d.SIFT_create()
    detector = DenseFeatureDetector(sift, step=15, scale=15, start=15)
    keypoints, features = detector.detect(image)
    dense_keypoints_on_image = cv2.drawKeypoints(image, keypoints, None)
    cv2.imwrite('dense.png', dense_keypoints_on_image)

【異常検知】GANを用いた画像の異常検知
ANOGAN, ADGAN, Efficient GANといったGANを用いて異常検知する手法が下記にまとめられています。 habakan6.hatenablog.com
ADGANとEfficient GANはANOGANを改良した手法になるようです。そのため手法の概念を学ぶには ANOGANを勉強すれば良さげです。初め解説読んでも良く分からなかったのですが、 ソースを探してコードを読むとイメージが掴めました(リンク先に韓国語が出てきてビックリしますが ページ下の方にスクロールすれば英語が出てきます)。
ANOGANがやっていること
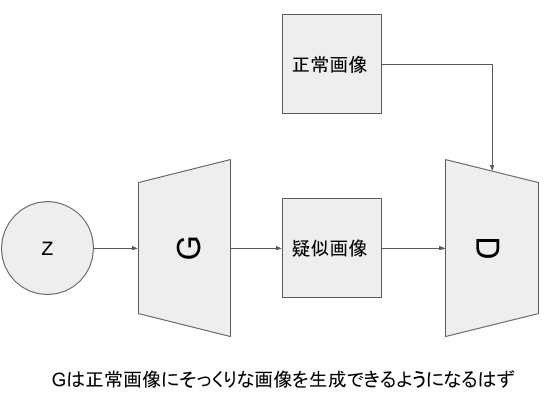
ステップ1 (学習)正常画像のみを使ってDCGANをトレーニングする
正常画像のみを使ってDCGANをトレーニングすると、
DCGANはzから正常画像にそっくりな画像を生成する能力を持つことになります。
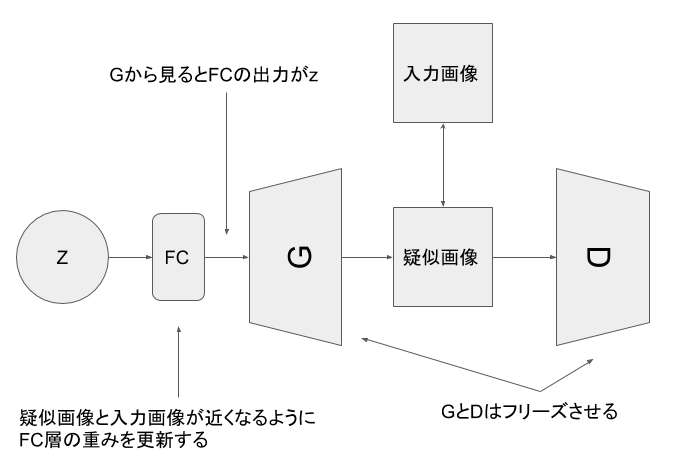
ステップ2 (予測)与えられた画像にそっくりな画像を生成できるzを探す
zは学習できないのでどうやってzを探すのかと思ったのですが、zにFC層をひっつけて
zとFC層をひっくるめてzとみなすことで、与えられた画像にそっくりな画像を
生成できるzを探すようです。DCGANは正常画像のみの知識しか持っていないため、
与えられた画像にそっくりな画像を生成するzが見つからなければそれは異常だと判断するようです。
実験
--- 試した環境 --- Windows10 Python 3.6 Keras 2.1.4 Tensorflow-gpu 1.5.0
--- フォルダ/ファイル構造 --- predict(予測画像保存フォルダ) result(学習途中の出力画像保存フォルダ) test(テスト用データ格納フォルダ) train(学習用データ格納フォルダ) weights(重み保存用フォルダ) anogan.py data_loader.py dcgan.py discriminator.py generator.py test.py train.py
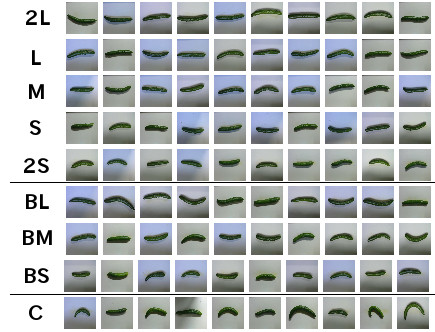
使うデータセットは9クラスに分類されたキュウリの画像です。 github.com
以下の写真のように9クラスに分類されていて、最高品質と思われる2Lのみを学習させ、
最低品質と思われるCの画像を復元できるか試します。
先程のgithubからコードを流用してDCGANを作成します。まずはGeneratorをgenerator.pyとして定義します。
from keras.models import Model
from keras.layers import Input, Dense, Conv2D, BatchNormalization, LeakyReLU, Reshape, Conv2DTranspose
from keras.layers.core import Activation


class Generator(object):
    def __init__(self, input_dim, image_shape):
        INITIAL_CHANNELS = 128
        INITIAL_SIZE = 8

        inputs = Input((input_dim,))
        fc1 = Dense(input_dim=input_dim, units=INITIAL_CHANNELS * INITIAL_SIZE * INITIAL_SIZE)(inputs)
        fc1 = BatchNormalization()(fc1)
        fc1 = LeakyReLU(0.2)(fc1)
        fc2 = Reshape((INITIAL_SIZE, INITIAL_SIZE, INITIAL_CHANNELS), input_shape=(INITIAL_CHANNELS * INITIAL_SIZE * INITIAL_SIZE,))(fc1)
        up1 = Conv2DTranspose(64, (2, 2), strides=(2, 2), padding='same')(fc2)
        conv1 = Conv2D(64, (3, 3), padding='same')(up1)
        conv1 = BatchNormalization()(conv1)
        conv1 = Activation('relu')(conv1)
        up2 = Conv2DTranspose(64, (2, 2), strides=(2, 2), padding='same')(conv1)
        conv2 = Conv2D(image_shape[2], (5, 5), padding='same')(up2)
        outputs = Activation('tanh')(conv2)

        self.model = Model(inputs=[inputs], outputs=[outputs])

    def get_model(self):
        return self.model
次にDiscriminatorをdiscriminator.pyとして作成します。
from keras.models import Model
from keras.layers import Input, Dense, Conv2D, MaxPooling2D, LeakyReLU, Flatten
from keras.layers.core import Activation

class Discriminator(object):
    def __init__(self, input_shape):
        inputs = Input(input_shape)
        conv1 = Conv2D(64, (5, 5), padding='same')(inputs)
        conv1 = LeakyReLU(0.2)(conv1)
        pool1 = MaxPooling2D(pool_size=(2, 2))(conv1)
        conv2 = Conv2D(128, (5, 5), padding='same')(pool1)
        conv2 = LeakyReLU(0.2)(conv2)
        pool2 = MaxPooling2D(pool_size=(2, 2))(conv2)
        fc1 = Flatten()(pool2)
        fc1 = Dense(1)(fc1)
        outputs = Activation('sigmoid')(fc1)

        self.model = Model(inputs=[inputs], outputs=[outputs])

    def get_model(self):
        return self.model
GeneratorとDiscriminatorが出来たのでDCGANをdcgan.pyとして書きます。
import math, cv2
import numpy as np
from generator import Generator
from discriminator import Discriminator
from keras.models import Model, Sequential
from keras.utils. generic_utils import Progbar

class DCGAN(object):
    def __init__(self, input_dim, image_shape):
        self.input_dim = input_dim
        self.d = Discriminator(image_shape).get_model()
        self.g = Generator(input_dim, image_shape).get_model()

    def compile(self, g_optim, d_optim):
        self.d.trainable = False
        self.dcgan = Sequential([self.g, self.d])
        self.dcgan.compile(loss='binary_crossentropy', optimizer=g_optim)
        self.d.trainable = True
        self.d.compile(loss='binary_crossentropy', optimizer=d_optim)

    def train(self, epochs, batch_size, X_train):
        g_losses = []
        d_losses = []
        for epoch in range(epochs):
            np.random.shuffle(X_train)
            n_iter = X_train.shape[0] // batch_size
            progress_bar = Progbar(target=n_iter)
            for index in range(n_iter):
                # create random noise -> N latent vectors
                noise = np.random.uniform(-1, 1, size=(batch_size, self.input_dim))

                # load real data & generate fake data
                image_batch = X_train[index * batch_size:(index + 1) * batch_size]
                for i in range(batch_size):
                    if np.random.random() > 0.5:
                        image_batch[i] = np.fliplr(image_batch[i])
                    if np.random.random() > 0.5:
                        image_batch[i] = np.flipud(image_batch[i])
                generated_images = self.g.predict(noise, verbose=0)

                # attach label for training discriminator
                X = np.concatenate((image_batch, generated_images))
                y = np.array([1] * batch_size + [0] * batch_size)

                # training discriminator
                d_loss = self.d.train_on_batch(X, y)

                # training generator
                g_loss = self.dcgan.train_on_batch(noise, np.array([1] * batch_size))

                progress_bar.update(index, values=[('g', g_loss), ('d', d_loss)])
            g_losses.append(g_loss)
            d_losses.append(d_loss)
            if (epoch+1)%10 == 0:
                image = self.combine_images(generated_images)
                image = (image + 1) / 2.0 * 255.0
                cv2.imwrite('./result/' + str(epoch) + ".png", image)
            print('\nEpoch' + str(epoch) + " end")

            # save weights for each epoch
            if (epoch+1)%50 == 0:
                self.g.save_weights('weights/generator_' + str(epoch) + '.h5', True)
                self.d.save_weights('weights/discriminator_' + str(epoch) + '.h5', True)
        return g_losses, d_losses

    def load_weights(self, g_weight, d_weight):
        self.g.load_weights(g_weight)
        self.d.load_weights(d_weight)

    def combine_images(self, generated_images):
        num = generated_images.shape[0]
        width = int(math.sqrt(num))
        height = int(math.ceil(float(num) / width))
        shape = generated_images.shape[1:4]
        image = np.zeros((height * shape[0], width * shape[1], shape[2]),
                         dtype=generated_images.dtype)
        for index, img in enumerate(generated_images):
            i = int(index / width)
            j = index % width
            image[i * shape[0]:(i + 1) * shape[0], j * shape[1]:(j + 1) * shape[1], :] = img[:, :, :]
        return image
DCGANを作成したのでトレーニング可能となりました。次はきゅうり画像読み込み部をdata_loader.pyとして作成します。
import cv2
from pathlib import Path
import numpy as np
from sklearn.model_selection import train_test_split

def load_image_and_label(pickled_files):
    # Each file contains 495 images
    IMAGE_COUNT_PER_FILE = 495
    # Image shape is 32x32x3
    ROW = 32
    COL = 32
    DIM = 3
    whole_images = np.empty((IMAGE_COUNT_PER_FILE*len(pickled_files), ROW, COL, DIM))
    whole_labels = np.empty(IMAGE_COUNT_PER_FILE*len(pickled_files))
    for i, pickled_file in enumerate(pickled_files):
        dict = _unpickle(pickled_file)
        images = dict['data'].reshape(IMAGE_COUNT_PER_FILE, DIM, ROW, COL).transpose(0, 2, 3, 1)
        whole_images[i*IMAGE_COUNT_PER_FILE:(i + 1)*IMAGE_COUNT_PER_FILE, :, :, :] = images
        labels = dict['labels']
        whole_labels[i*IMAGE_COUNT_PER_FILE:(i + 1)*IMAGE_COUNT_PER_FILE] = labels
    return (whole_images, whole_labels)

def _unpickle(pickled_file):
    import pickle

    with open(pickled_file, 'rb') as file:
        # You'll have an error without "encoding='latin1'"
        dict = pickle.load(file, encoding='latin1')
    return dict

# Function to load cucumber-9 dataset and split it into training and test data
def load_cucumber():
    (X1, y1) = load_image_and_label(['Train\\data_batch_1',
                                     'Train\\data_batch_2',
                                     'Train\\data_batch_3',
                                     'Train\\data_batch_4',
                                     'Train\\data_batch_5'])
    (X2, y2) = load_image_and_label(['Test\\test_batch'])
    X = np.concatenate((X1, X2), axis=0)
    y = np.concatenate((y1, y2), axis=0)
    # 2L as normal
    normal_index = np.where(y == 0)
    # C as anomaly
    anomaly_index = np.where(y == 8)
    X_normal = X[normal_index]
    X_anomaly = X[anomaly_index]
    y_normal = y[normal_index]
    y_anomaly = y[anomaly_index]
    # split normal images into train and test data
    X_train, X_test, y_train, y_test = train_test_split(X_normal, y_normal, test_size=0.2, stratify=y_normal, random_state=0)
    X_test = np.concatenate((X_test, X_anomaly), axis=0)
    y_test = np.concatenate((y_test, y_anomaly), axis=0)
    y_test = y_test == 8
    return X_train, X_test, y_test
これでDCGANに正常なきゅうり画像を生成させる準備が整いました。学習部はtrain.pyとして以下を記述します。
from dcgan import DCGAN
import numpy as np
from keras.optimizers import Adam
from data_loader import load_cucumber


def normalize(X):
    return (X-127.5)/127.5


def denormalize(X):
    return ((X + 1.0)/2.0*255.0).astype(dtype=np.uint8)


if __name__ == '__main__':
    batch_size = 16
    epochs = 4000
    input_dim = 30
    g_optim = Adam(lr=0.0001, beta_1=0.5, beta_2=0.9)
    d_optim = Adam(lr=0.0001, beta_1=0.5, beta_2=0.9)

    ### 0. prepare data
    X_train, X_test, y_test = load_cucumber()
    X_train = normalize(X_train)
    X_test = normalize(X_test)
    input_shape = X_train[0].shape
    X_test_original = X_test.copy()

    ### 1. train generator & discriminator
    dcgan = DCGAN(input_dim, input_shape)
    dcgan.compile(g_optim, d_optim)
    g_losses, d_losses = dcgan.train(epochs, batch_size, X_train)
    with open('loss.csv', 'w') as f:
        for g_loss, d_loss in zip(g_losses, d_losses):
            f.write(str(g_loss) + ',' + str(d_loss) + '\n')
学習経過を見ていくと、確かにきゅうりの画像が生成されています(左から10エポック終了時、500エポック終了時、1000エポック終了時)。
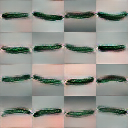
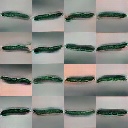
ひとまずDCGANが正常なきゅうり画像を生成できるようになったと仮定し、次に予測を実行します。予測では入力画像に近い画像を生成できるzを探す必要があるため、DCGANはそのまま使うことができません。zを探索できる構造を持ったモデルをANOGANとし、anogan.pyとして書きます。ちなみに結果に違いが感じられなかったため、オリジナルと異なりDiscriminatorの中間層ロスは使用していません。
import numpy as np
from keras.models import Model
from keras.layers import Input, Dense
import keras.backend as K

def sum_of_residual(y_true, y_pred):
    return K.sum(K.abs(y_true - y_pred))

class ANOGAN(object):
    def __init__(self, input_dim, g):
        self.input_dim = input_dim
        self.g = g
        g.trainable = False
        # Input layer cann't be trained. Add new layer as same size & same distribution
        anogan_in = Input(shape=(input_dim,))
        g_in = Dense((input_dim), activation='tanh', trainable=True)(anogan_in)
        g_out = g(g_in)
        self.model = Model(inputs=anogan_in, outputs=g_out)
        self.model_weight = None

    def compile(self, optim):
        self.model.compile(loss=sum_of_residual, optimizer=optim)
        K.set_learning_phase(0)

    def compute_anomaly_score(self, x, iterations=300):
        z = np.random.uniform(-1, 1, size=(1, self.input_dim))

        # learning for changing latent
        loss = self.model.fit(z, x, batch_size=1, epochs=iterations, verbose=0)
        loss = loss.history['loss'][-1]
        similar_data = self.model.predict_on_batch(z)

        return loss, similar_data
これで予測準備が整ったので、予測部をtest.pyとして書きます。
import os, cv2
from dcgan import DCGAN
from anogan import ANOGAN
import numpy as np
from keras.optimizers import Adam
from data_loader import load_cucumber
from train import normalize, denormalize


if __name__ == '__main__':
    iterations = 100
    input_dim = 30
    anogan_optim = Adam(lr=0.001, amsgrad=True)

    ### 0. prepare data
    X_train, X_test, y_test = load_cucumber()
    X_train = normalize(X_train)
    X_test = normalize(X_test)
    input_shape = X_train[0].shape

    ### 1. train generator & discriminator
    dcgan = DCGAN(input_dim, input_shape)
    dcgan.load_weights('weights/generator_3999.h5', 'weights/discriminator_3999.h5')

    for i, test_img in enumerate(X_test):
        test_img = test_img[np.newaxis,:,:,:]
        anogan = ANOGAN(input_dim, dcgan.g)
        anogan.compile(anogan_optim)
        anomaly_score, generated_img = anogan.compute_anomaly_score(test_img, iterations)
        generated_img = denormalize(generated_img)
        imgs = np.concatenate((denormalize(test_img[0]), generated_img[0]), axis=1)
        cv2.imwrite('predict' + os.sep + str(int(anomaly_score)) + '_' + str(i) + '.png', imgs)
        print(str(i) + ' %.2f'%anomaly_score)
        with open('scores.txt', 'a') as f:
            f.write(str(anomaly_score) + '\n')
test.pyを実行した結果の一部を下記に載せます。
正常画像を見せてそっくりな画像を生成した例
左側がオリジナル、右側が生成された画像です


異常画像を見せてそっくりな画像を生成できなかった例


正常画像を見せてそっくりな画像を生成できなかった例


異常画像を見せてそっくりな画像を生成した例


かなり反り返ったきゅうりのように、明らかに正常画像と異なる画像は狙った通り復元できないようです。 一方で正常画像を上手く復元できないケース、異常画像をそこそこ復元してしまうケースもあり、 成績だけ見れば前回のオートエンコーダーを使った手法の方が良かったです。 また、予測時にzを探索するため32×32×3といった小さな画像でも予測時間が長いため 使いづらい印象を受けました(予測時間の問題はEfficient GANを利用すれば解決できそうです)。
【WPF】回転中心を指定してコントロールを90度回転させたい
画面に表示させる画像を90度回転させて表示したいことがあったのですが、普通にRotateTransformを指定すると、コントロールの左上を回転中心として回転してしまいました。コントロールの中心を回転中心としたかったのですが、以下のようにRenderTransformOriginを指定すれば良いようです。
<Image RenderTransformOrigin="0.5, 0.5">
    <Image.RenderTransform>
        <RotateTransform Angle="90"/>
    </Image.RenderTransform>
</Image>
この質問と回答は以下のリンク先にあるのですが、注意すべき点として、一番トップにある回答では実現できず、二番目にある回答が上記コードになります。確かにスコアは二番目の回答の方が高いのですが、何故か一番目の回答に回答としてのチェックが入っているため注意が必要です。 stackoverflow.com
【WPF】DataGridのScrollバーをトップへ移動させる
DataGridに大量のデータを表示します。その時画面にデータ全てを表示できないのでスクロールバーを使ってデータを閲覧します。この状態であるイベントを起こした時に下の方に移動したスクロールバーをトップに持って行きたいという状況。これは以下の方法で実現できるようです(実際試して出来ました)。
var border = VisualTreeHelper.GetChild(myDataGrid, 0) as Decorator;
if (border != null)
{
    var scrollViewer = border.Child as ScrollViewer;
    scrollViewer.ScrollToTop();
}
同様の質問と回答があるStackoverflowへのリンク stackoverflow.com
【異常検知】オートエンコーダーを用いた画像の異常検知
以下のサイトで画像の異常検知をやっていて面白そうなので自分でも試してみました。 qiita.com
--- 試した環境 --- Windows10 Python 3.6 Keras 2.1.4 Tensorflow-gpu 1.5.0
使うデータセットは9クラスに分類されたキュウリの画像です。 github.com
以下の写真のように9クラスに分類されていて、最高品質と思われる2Lのみを学習させ、最低品質と思われるCを検出できるかどうか試します。

まず、以下のようにautoencoder.pyにオートエンコーダーを定義します。画像に適用するので、Convolutionalオートエンコーダーを定義しています。
#!/usr/bin/env python
# -*- coding: utf-8 -*-
from keras.models import Model
from keras.layers import Input
from keras.layers.convolutional import Conv2D, MaxPooling2D, Conv2DTranspose

class AutoEncoder(object):
    def __init__(self, input_shape, first_layer_channels):
        self.CONV_FILTER_SIZE = 3
        self.CONV_STRIDE = 1
        self.DECONV_FILTER_SIZE = 3
        self.DECONV_STRIDE = 2

        # (32 x 32 x 3)
        inputs = Input(input_shape)

        # エンコーダーの作成
        # (16 x 16 x N)
        filter_count = first_layer_channels
        enc1 = self._add_encoding_layer(filter_count, inputs)

        # (8 x 8 x 2N)
        filter_count = first_layer_channels*2
        enc2 = self._add_encoding_layer(filter_count, enc1)

        # (4 x 4 x 4N)
        filter_count = first_layer_channels*4
        enc3 = self._add_encoding_layer(filter_count, enc2)

        # (8 x 8 x 2N)
        filter_count = first_layer_channels*2
        dec3 = self._add_decoding_layer(filter_count, enc3)

        # (16 x 16 x N)
        filter_count = first_layer_channels
        dec2 = self._add_decoding_layer(filter_count, dec3)

        # (32 x 32 x 3)
        filter_count = input_shape[2]
        dec1 = self._add_decoding_layer(filter_count, dec2)

        self.AutoEncoder = Model(input=inputs, output=dec1)
        #print(self.AutoEncoder.summary())

    def _add_encoding_layer(self, filter_count, sequence):
        new_sequence = Conv2D(filter_count, self.CONV_FILTER_SIZE, strides=self.CONV_STRIDE, padding='same', activation='relu')(sequence)
        new_sequence = MaxPooling2D()(new_sequence)
        return new_sequence

    def _add_decoding_layer(self, filter_count, sequence):
        new_sequence = Conv2DTranspose(filter_count, self.DECONV_FILTER_SIZE, strides=self.DECONV_STRIDE, padding='same',
                                       kernel_initializer='he_uniform', activation='relu')(sequence)
        return new_sequence

    def get_model(self):
        return self.AutoEncoder
次にtrain.pyを作成します。train.pyには画像読み込み処理、学習処理を書きます。
import numpy as np
from sklearn.model_selection import train_test_split
from autoencoder import AutoEncoder
from keras.optimizers import Adam, RMSprop, SGD

def load_image_and_label(pickled_files):
    # Each file contains 495 images
    IMAGE_COUNT_PER_FILE = 495
    # Image shape is 32x32x3
    ROW = 32
    COL = 32
    DIM = 3
    whole_images = np.empty((IMAGE_COUNT_PER_FILE*len(pickled_files), ROW, COL, DIM))
    whole_labels = np.empty(IMAGE_COUNT_PER_FILE*len(pickled_files))
    for i, pickled_file in enumerate(pickled_files):
        dict = _unpickle(pickled_file)
        images = dict['data'].reshape(IMAGE_COUNT_PER_FILE, DIM, ROW, COL).transpose(0, 2, 3, 1)
        whole_images[i*IMAGE_COUNT_PER_FILE:(i + 1)*IMAGE_COUNT_PER_FILE, :, :, :] = images
        labels = dict['labels']
        whole_labels[i*IMAGE_COUNT_PER_FILE:(i + 1)*IMAGE_COUNT_PER_FILE] = labels
    return (whole_images, whole_labels)

def _unpickle(pickled_file):
    import pickle

    with open(pickled_file, 'rb') as file:
        # You'll have an error without "encoding='latin1'"
        dict = pickle.load(file, encoding='latin1')
    return dict

# Function to load cucumber-9 dataset and split it into training and test data
def load():
    (X1, y1) = load_image_and_label(['Train\\data_batch_1',
                                     'Train\\data_batch_2',
                                     'Train\\data_batch_3',
                                     'Train\\data_batch_4',
                                     'Train\\data_batch_5'])
    (X2, y2) = load_image_and_label(['Test\\test_batch'])
    X = np.concatenate((X1, X2), axis=0)
    y = np.concatenate((y1, y2), axis=0)
    # 2L as normal
    normal_index = np.where((y == 0))
    # C as anomaly
    anomaly_index = np.where(y == 8)
    X_normal = X[normal_index]
    X_anomaly = X[anomaly_index]
    y_normal = y[normal_index]
    y_anomaly = y[anomaly_index]
    # split normal images into train and test data
    X_train, X_test, y_train, y_test = train_test_split(X_normal, y_normal, test_size=0.2, stratify=y_normal, random_state=0)
    X_test = np.concatenate((X_test, X_anomaly), axis=0)
    y_test = np.concatenate((y_test, y_anomaly), axis=0)
    y_test = y_test == 8
    return X_train/255, X_test/255, y_test

if __name__ == '__main__':
    batch_size = 32
    epochs = 500
    first_layer_channels = 32

    X_train, X_test, y_test = load()
    input_shape = X_train[0].shape
    auto_encoder = AutoEncoder(input_shape, first_layer_channels)
    model = auto_encoder.get_model()
    model.compile(optimizer=Adam(lr=1e-3, amsgrad=True), loss='mse')
    model.fit(X_train, X_train, batch_size=batch_size, epochs=epochs)
    model.save_weights('weights.hdf5')
最後に予測処理部をtest.pyとして書きます。
from train_cucumber1 import load
from autoencoder import AutoEncoder
import numpy as np

if __name__ == '__main__':
    batch_size = 64
    first_layer_channels = 32

    # load data
    X_train, X_test, y_test = load()
    # load model
    input_shape = X_train[0].shape
    auto_encoder = AutoEncoder(input_shape, first_layer_channels)
    model = auto_encoder.get_model()
    model.load_weights('weights.hdf5')
    # Apply prediction to training data to determine threshold
    y_train_predict = model.predict(X_train, batch_size=batch_size)
    # Check difference between inputs and outputs
    diff_train = np.sum(np.abs(X_train - y_train_predict), axis=(1,2,3))
    diff_train_mean = np.mean(diff_train)
    diff_train_std = np.std(diff_train)
    #print(str(diff_train_mean))
    #print(str(diff_train_std))
    # Determine threshold
    thresh = diff_train_mean + 2*diff_train_std

    # Apply prediction to test data
    y_test_predict = model.predict(X_test, batch_size=batch_size)
    diff_test = np.sum(np.abs(X_test - y_test_predict), axis=(1,2,3))
    # First 66 data is 2L quality so these values are expected to have small values
    diff_test_normal = diff_test[:66]
    # Remaining data is C quality so these values are expected to have large values
    diff_test_anomaly = diff_test[66:]
    true_positive = np.sum(diff_test_anomaly >= thresh)
    false_positive = np.sum(diff_test_normal >= thresh)
    false_negative = np.sum(diff_test_anomaly < thresh)
    precision = true_positive/(true_positive + false_positive)
    recall = true_positive/(true_positive + false_negative)
    f_measure = 2*recall*precision/(recall + precision)
    print(f_measure)
正常画像(2L)に対する復元誤差(青色)と異常画像(C)に対する復元誤差(橙色)の分布を以下に描画します。F値は0.96と良好な値ではあるものの、分布を見ると結構被ってる印象を受けるため、実戦で使うには一工夫必要そうです。

【Python】 x-meansを使ってクラスタリングする例
k-meansのクラスタ数を自動で決めてくれるx-meansという手法があることを以下で知ったので試してみようとしました。 qiita.com ただリンク先のコードは自分のデータセットに対しては「行列式が0で計算できない」といったようなエラーが出ました。それで代わりにx-meansを実装しているpyclusteringというライブラリで試したので、pyclusteringのx-meansの使い方をメモとして残します(pyclusteringはpip install pyclusteringでインストールできます)。
# -*- coding: utf-8 -*-
import numpy as np
from pyclustering.cluster.xmeans import xmeans, kmeans_plusplus_initializer
from pyclustering.utils import draw_clusters

if __name__ == "__main__":
    # データの準備
    x = np.array([np.random.normal(loc, 0.1, 20) for loc in np.repeat([1,2], 2)]).flatten() #ランダムな80個の数を生成
    y = np.array([np.random.normal(loc, 0.1, 20) for loc in np.tile([1,2], 2)]).flatten() #ランダムな80個の数を生成
    points = np.concatenate((x[np.newaxis,:], y[np.newaxis,:]), axis=0).T.tolist()

    # クラスタ数2から探索させてみる
    initial_centers = kmeans_plusplus_initializer(points, 2).initialize()
    # クラスタリングの実行
    instances = xmeans(points, initial_centers, ccore=True)
    instances.process()
    # クラスタはget_clustersで取得できる
    clusters = instances.get_clusters()
    # クラスタの平均は以下で計算できる
    centers = []
    points = np.array(points)
    for cluster in clusters:
        c = points[cluster, :]
        centers.append(np.mean(c, axis=0))
    # クラスタリング結果を表示する
    draw_clusters(points, clusters)
