【異常検知】オートエンコーダーを用いた画像の異常検知
以下のサイトで画像の異常検知をやっていて面白そうなので自分でも試してみました。 qiita.com
--- 試した環境 --- Windows10 Python 3.6 Keras 2.1.4 Tensorflow-gpu 1.5.0
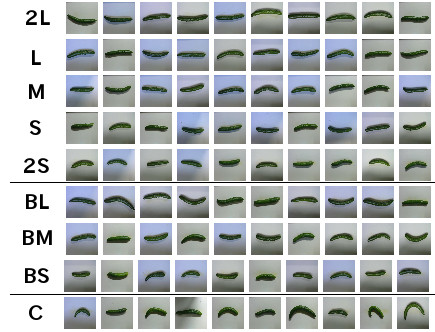
使うデータセットは9クラスに分類されたキュウリの画像です。 github.com
以下の写真のように9クラスに分類されていて、最高品質と思われる2Lのみを学習させ、最低品質と思われるCを検出できるかどうか試します。

まず、以下のようにautoencoder.pyにオートエンコーダーを定義します。画像に適用するので、Convolutionalオートエンコーダーを定義しています。
#!/usr/bin/env python
# -*- coding: utf-8 -*-
from keras.models import Model
from keras.layers import Input
from keras.layers.convolutional import Conv2D, MaxPooling2D, Conv2DTranspose

class AutoEncoder(object):
    def __init__(self, input_shape, first_layer_channels):
        self.CONV_FILTER_SIZE = 3
        self.CONV_STRIDE = 1
        self.DECONV_FILTER_SIZE = 3
        self.DECONV_STRIDE = 2

        # (32 x 32 x 3)
        inputs = Input(input_shape)

        # エンコーダーの作成
        # (16 x 16 x N)
        filter_count = first_layer_channels
        enc1 = self._add_encoding_layer(filter_count, inputs)

        # (8 x 8 x 2N)
        filter_count = first_layer_channels*2
        enc2 = self._add_encoding_layer(filter_count, enc1)

        # (4 x 4 x 4N)
        filter_count = first_layer_channels*4
        enc3 = self._add_encoding_layer(filter_count, enc2)

        # (8 x 8 x 2N)
        filter_count = first_layer_channels*2
        dec3 = self._add_decoding_layer(filter_count, enc3)

        # (16 x 16 x N)
        filter_count = first_layer_channels
        dec2 = self._add_decoding_layer(filter_count, dec3)

        # (32 x 32 x 3)
        filter_count = input_shape[2]
        dec1 = self._add_decoding_layer(filter_count, dec2)

        self.AutoEncoder = Model(input=inputs, output=dec1)
        #print(self.AutoEncoder.summary())

    def _add_encoding_layer(self, filter_count, sequence):
        new_sequence = Conv2D(filter_count, self.CONV_FILTER_SIZE, strides=self.CONV_STRIDE, padding='same', activation='relu')(sequence)
        new_sequence = MaxPooling2D()(new_sequence)
        return new_sequence

    def _add_decoding_layer(self, filter_count, sequence):
        new_sequence = Conv2DTranspose(filter_count, self.DECONV_FILTER_SIZE, strides=self.DECONV_STRIDE, padding='same',
                                       kernel_initializer='he_uniform', activation='relu')(sequence)
        return new_sequence

    def get_model(self):
        return self.AutoEncoder
次にtrain.pyを作成します。train.pyには画像読み込み処理、学習処理を書きます。
import numpy as np
from sklearn.model_selection import train_test_split
from autoencoder import AutoEncoder
from keras.optimizers import Adam, RMSprop, SGD

def load_image_and_label(pickled_files):
    # Each file contains 495 images
    IMAGE_COUNT_PER_FILE = 495
    # Image shape is 32x32x3
    ROW = 32
    COL = 32
    DIM = 3
    whole_images = np.empty((IMAGE_COUNT_PER_FILE*len(pickled_files), ROW, COL, DIM))
    whole_labels = np.empty(IMAGE_COUNT_PER_FILE*len(pickled_files))
    for i, pickled_file in enumerate(pickled_files):
        dict = _unpickle(pickled_file)
        images = dict['data'].reshape(IMAGE_COUNT_PER_FILE, DIM, ROW, COL).transpose(0, 2, 3, 1)
        whole_images[i*IMAGE_COUNT_PER_FILE:(i + 1)*IMAGE_COUNT_PER_FILE, :, :, :] = images
        labels = dict['labels']
        whole_labels[i*IMAGE_COUNT_PER_FILE:(i + 1)*IMAGE_COUNT_PER_FILE] = labels
    return (whole_images, whole_labels)

def _unpickle(pickled_file):
    import pickle

    with open(pickled_file, 'rb') as file:
        # You'll have an error without "encoding='latin1'"
        dict = pickle.load(file, encoding='latin1')
    return dict

# Function to load cucumber-9 dataset and split it into training and test data
def load():
    (X1, y1) = load_image_and_label(['Train\\data_batch_1',
                                     'Train\\data_batch_2',
                                     'Train\\data_batch_3',
                                     'Train\\data_batch_4',
                                     'Train\\data_batch_5'])
    (X2, y2) = load_image_and_label(['Test\\test_batch'])
    X = np.concatenate((X1, X2), axis=0)
    y = np.concatenate((y1, y2), axis=0)
    # 2L as normal
    normal_index = np.where((y == 0))
    # C as anomaly
    anomaly_index = np.where(y == 8)
    X_normal = X[normal_index]
    X_anomaly = X[anomaly_index]
    y_normal = y[normal_index]
    y_anomaly = y[anomaly_index]
    # split normal images into train and test data
    X_train, X_test, y_train, y_test = train_test_split(X_normal, y_normal, test_size=0.2, stratify=y_normal, random_state=0)
    X_test = np.concatenate((X_test, X_anomaly), axis=0)
    y_test = np.concatenate((y_test, y_anomaly), axis=0)
    y_test = y_test == 8
    return X_train/255, X_test/255, y_test

if __name__ == '__main__':
    batch_size = 32
    epochs = 500
    first_layer_channels = 32

    X_train, X_test, y_test = load()
    input_shape = X_train[0].shape
    auto_encoder = AutoEncoder(input_shape, first_layer_channels)
    model = auto_encoder.get_model()
    model.compile(optimizer=Adam(lr=1e-3, amsgrad=True), loss='mse')
    model.fit(X_train, X_train, batch_size=batch_size, epochs=epochs)
    model.save_weights('weights.hdf5')
最後に予測処理部をtest.pyとして書きます。
from train_cucumber1 import load
from autoencoder import AutoEncoder
import numpy as np

if __name__ == '__main__':
    batch_size = 64
    first_layer_channels = 32

    # load data
    X_train, X_test, y_test = load()
    # load model
    input_shape = X_train[0].shape
    auto_encoder = AutoEncoder(input_shape, first_layer_channels)
    model = auto_encoder.get_model()
    model.load_weights('weights.hdf5')
    # Apply prediction to training data to determine threshold
    y_train_predict = model.predict(X_train, batch_size=batch_size)
    # Check difference between inputs and outputs
    diff_train = np.sum(np.abs(X_train - y_train_predict), axis=(1,2,3))
    diff_train_mean = np.mean(diff_train)
    diff_train_std = np.std(diff_train)
    #print(str(diff_train_mean))
    #print(str(diff_train_std))
    # Determine threshold
    thresh = diff_train_mean + 2*diff_train_std

    # Apply prediction to test data
    y_test_predict = model.predict(X_test, batch_size=batch_size)
    diff_test = np.sum(np.abs(X_test - y_test_predict), axis=(1,2,3))
    # First 66 data is 2L quality so these values are expected to have small values
    diff_test_normal = diff_test[:66]
    # Remaining data is C quality so these values are expected to have large values
    diff_test_anomaly = diff_test[66:]
    true_positive = np.sum(diff_test_anomaly >= thresh)
    false_positive = np.sum(diff_test_normal >= thresh)
    false_negative = np.sum(diff_test_anomaly < thresh)
    precision = true_positive/(true_positive + false_positive)
    recall = true_positive/(true_positive + false_negative)
    f_measure = 2*recall*precision/(recall + precision)
    print(f_measure)
正常画像(2L)に対する復元誤差(青色)と異常画像(C)に対する復元誤差(橙色)の分布を以下に描画します。F値は0.96と良好な値ではあるものの、分布を見ると結構被ってる印象を受けるため、実戦で使うには一工夫必要そうです。
